EDITIONS
MORE

PRE-BCP

BUILDING BCP

UPDATING BCP

Menu
King Phoenix and Chaos are battling for business continuity supremacy. Use a Simple & Secure BCP.

SHIELD Quick Start Guide:

Welcome to the SHIELD Quick Start Guide! We’re excited to provide you with a simple and secure business continuity planning experience.

While SHIELD is pretty easy to use, we’ve put this Quick Start Guide together to remove any guess work and ensure you leverage all of the great features SHIELD has to offer.

We broke the SHIELD Quick Start Guide into 3 parts:

Part 1. Before you get started with SHIELD:

In this section we’ll give you a few things you may want to consider before you start using SHIELD to ensure you have the best possible user experience.

Part 2. Getting Started with SHIELD:

With the foundation set in Part 1, Part 2 is the largest section of the guide where we walk you through the best way to start building your plan in SHIELD.

Part 3. Training, Mentoring and Ongoing Support:

If you need help along the way, Part 3 outlines all of the resources you have available to you.

This guide assumes that you, the reader, are a SHIELD Administrator and will be responsible for setting up the basic structure of SHIELD for your organization and granting access to SHIELD Users.

Throughout this guide, there are hyperlinks to our support pages to show you how to execute the steps we have laid out for you.

Quick Start Guide - Part 1. Before you get started with SHIELD:

  • Browser Selection:

    SHIELD has been optimized for use with the Chrome browser.  Whenever possible we recommend using Chrome when accessing your SHIELD account.  While other browsers will work, the best user experience will come from using Chrome.
Chrome - Quick Start Guide
  • Information Security infrastructure and SHIELD:  

Sometimes company security systems can interfere with the secure communication between you, the end user, and the SHIELD servers.  Before you start using SHIELD we recommend you check with your Information Security department to see if there is any web traffic monitoring software that might be decrypting/encrypting the secure traffic between your computer and the SHIELD server.  

For optimal performance, we recommend using a bypass to allow SHIELD web traffic to travel uninterrupted between your desk and SHIELD.  If your organization uses an email gateway to filter inbound email, it may just filter out your SHIELD password too!  We recommend speaking with your IT department about white labeling kingsbridgebcp.com so that password emails and replies from our support team get through to you uninterrupted.

  • SHIELD Communication Tools:  

    If you’re a Gold or Platinum user, you may be interested in our SHIELD Communications functionality. With SHIELD Communications you can send email and text messages to your whole organization and set up conference calls. Let us know when you’re ready to start using your Communications Tools by contacting us and we’ll get your account set up and provide you with the numbers/codes that you’ll receive communications from.

NOTE: Are you a financial institution, or a municipality?  We have specialized templates for each of these sectors.  Just contact us if you’d like us to switch up your template to one of these two.

Part 2. Getting Started with SHIELD

Step 1. Passwords

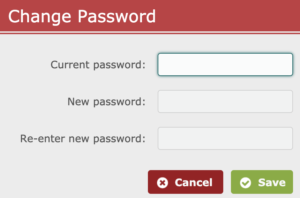
So you’re now ready to login and use SHIELD. You should have already received your password to SHIELD so use that to login and be sure to change that password to something you’ll be able to remember.

SHIELD only requires that a password have a minimum length of 6. For something more robust you may be interested in setting a custom password policy that aligns with the security policies within your organization.

Change Password - Quick Start Guide

Step 2. Plan Markup

Plan Markup - Quick Start Guide

Plan Markup allows you to populate frequently used information that is subject to change by using short forms that represent lengthier content (e.g. company address, company name, terminology, key systems). These short forms and their replacement content are stored in the Plan Markup table.

One of the first things you’ll want to do before you start creating your plan in SHIELD is to update the Plan Markup table.  Enter the correct replacement information for your organization and determine if there are additional plan-markups that you may want to add.

Step 3. Load Data Tables

Load Data Tables - Quick Start Guide

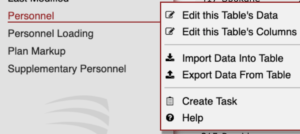
In order to start building your plan, there are some data tables that you’ll want to import into the Supporting Data section of SHIELD. Data entered into this section can be used to create reports in your plan, complete BIA surveys, build teams and grant access to SHIELD.

Start with importing your personnel table as that will allow you to build your teams and grant access. Once the personnel table is in, you can import other data tables that may be helpful to support your plan.

Step 4. Granting Initial Access

If you’re using a Gold or Platinum level account, you may have other Administrators that will be helping you with getting SHIELD set up for use. You can grant access to other Administrators to help you with the process.

Granting Initial Access - Quick Start Guide

Step 5. Decide on your teams

Decide on your teams - Quick Start Guide

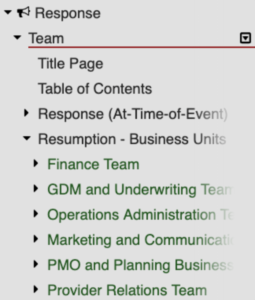
SHIELD is designed with a team concept in mind. People who are on teams, only see the content for the teams that they are a part of as well as any content created outside of a team.

The next step in building your plan in SHIELD is to decide what teams you want in your plan. You can use an existing team in the template and modify the name to suit your organization, or you may want to add a new team. Finally, there may be teams in the SHIELD template that don’t apply to your organization at all. These you can simply remove.

NOTE: If you changed the name of the Business Continuity Management Team or Senior Management in the Plan Markup table (Step 2.), you’ll want to modify the name of the corresponding teams provided in the template.

Step 6. Determine your team membership

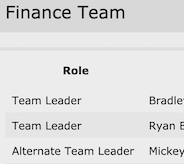
Once you’ve determined your teams, you’ll want to think about who should be on these teams as well as what role they will play – Team Leader, Alternate Team Leader, Team Member. Add people to your teams to give you a sense of who your key players will be in your plan.

Determine your team membership - Quick Start Guide

Step 7. Enter/modify content

With your data tables loaded and your team structure laid out, it’s now time to modify the SHIELD content to suit your needs.  You’ll want to review the content that is currently there and then do one or more of the following:

a) Edit the existing content to suit your needs.

b) Add new sections or remove existing sections that don’t meet your needs.

c) Move sections around to make the information flow.

d) Create reports from your SHIELD data tables.

e) Create hyperlinks to other SHIELD sections, websites or Supporting Documents (see Step 8.).

If you haven’t already done so, you may also want to consider:

a) Completing the TRA

b) Completing the BIA

Step 8. Add Supporting Documents

With the basics of your plan created in Step 7, there may be additional supporting documentation that you’d like to add to your plan. Upload documents to your plan under specific teams or to the Public folder.

You may also wish to create custom folders for your plan.

Step 9. Modify other modules

There are other modules in SHIELD, outside of the Team Response that contain information that you may want to include in your plan. Take some time to review the other information in the My Plan component and edit as you see fit. Then consider whether you want to grant access to any of these other modules (See Step 10.)

Step 10. Grant access

With your plan ready to go, you are now ready to grant access to your team members. By default, they will be granted access to the Team module inside “Response” but you can modify their access to see other modules and components too.

Grant Access - Quick Start Guide

You’ll want to decide how you want to manage changes to your plan and therefore whether to grant Read Only or Read/Write access to team members.

Other Features to explore:

a) Use the Mobile App and control access to the app.

b) Publish your plan to create a PDF that can be shared.

c) Get your team using Tasks.

d) Leverage SHIELD Communication Tools (for Gold and Platinum subscribers only).

e) Use Analytics to ensure your plan stays up to date.

Part 3. Training, Mentoring and ongoing support

Training

We provide custom administrator and read/write training as well pre-recorded videos for both read only and read/write users. For all your training needs, contact us and we'll be happy to talk through your needs.

Mentoring hours

In addition, if you’d like some assistance with writing your plan and identifying the best way to leverage SHIELD to support the maintenance of your plan, you have mentoring hours every year (depending on your SHIELD subscription). Don't waste them!  Get in touch with us to arrange some mentoring.

Other Questions?

 
eyegraduation-hatlicensebookconstructionlayers linkedin facebook pinterest youtube rss twitter instagram facebook-blank rss-blank linkedin-blank pinterest youtube twitter instagram